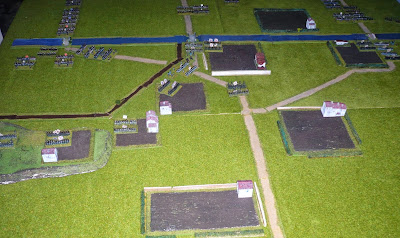
General Situation: After his victory over Blake's advancing Spanish at Miranda, Bessieres has moved quickly onto the offensive to relieve the 1000 Imperial Guardsmen guarding the city - and more crucially, the large supply depot - at Burgos. Confident after his recent success and reinforced by Merle's Division, Bessieres is confident that his advance will be easy, perhaps even unopposed. His opposite number, Gen Blake, endured a a restless evening wondering whether he was risking his army for an insufficient object...but patriotic fervour is running high in the Spanish Army at this time, seeking to emulate the successes of the Armies of Valencia and Andalusia, so he decides on trying to defend the river line against the Imperial Forces, hoping to give them a bloody nose if they attempt anything rash...
The Forces:
Imperial Forces:
II Corps (C-in-C Bessieres - Decisive)
Imperial Guard Division: 1500 Guardsmen, 1000 Guard Light Cavalry
Lasalle's Division: 1000 Light Cavalry
Merle's Division: 7500 Infantry
Mouton's Division: 12000 Infantry, 1000 Dragoons
Guns:48
Totals: 21000 Infantry, 3000 Cavalry, 48 Guns
Spanish Forces:
Army of Galicia (C-in-C Gen Blake - Competent)
Macedo's Division: 1500 Infantry, 1000 Light Cavalry
Cagigal's Division: 4500 Infantry
Martinengo's Division: 3000 Infantry
Riquelme's Division: 4500 Infantry
Portago's Division: 6000 Infantry
Guns: 54
Totals: 19500 Infantry, 1000 Cavalry, 54 Guns
Set-Up:
 |
| View looking East - Riquelme's and Cagigal's Divisions protect the Spanish Left with their infantry in a strong position, protected by a stream and situated on hills and in enclosures. |
 |
| View from the South, behind the Spanish lines - note only a single brigade in reserve on this part of the field (raw troops from Cagigal's Division) |
The First Assault:
 |
| Spanish troops begin to pull back - on this flank too, very limited damage is done to the Spanish as they break contact quite easily. |
A battle with some resemblance to Zornoza ,Blake wasn't particularly serious about fighting, just tempting the French to do something really rash without being very intent on holding the ground or defeating the French. Casulaties were relatively light on both sides - something over 1,000 from the Spanish (mostly from Portago's infantry), something closer to 800 for the French (about evenly spread between the Fusiliers-Chasseurs, Mouton's infantry and Lasalle's cavalry)
Game Notes:
Played out with the Polemos Marechal d'Empire Napoleonic I was in two minds whether to actually fight this one out, knowing that Bessieres main objective was to relieve Burgos and Blake was inclined to withdraw. It did prove quite enjoyable however, with the pressure on Bessieres to organize a succesful assault to break the Spanish position, then Blake to withdraw in good order (I played it out until I judged the Spanish had successfully broken contact). Bessieres position with the Guard was probably wise to help ensure success at the crucial point, but the distances made controlling Mouton's attack very difficult. Lasalle's attack was a gamble by which Blake profitted - not so much for the damage done to Lasalle's Division (transient), but the commitment of the French cavalry meant that there was no reserve for any pursuit.


No comments:
Post a Comment